The last 3 days I spent time on organizing my stamps. I had it previously in cd cases which I kept in the ikea cube (plastic cube drawer). I found it difficult to search and some of the other stamps were too big to fit in the cd cases. So I decided to change.
Now since I had already organized once before my rubber stamps were already off the wooden block.
I usually microwave the rubber stamps for 12 secs and then immediately remove the stamp with the foam which comes off easily and sticks to block. If the foam is cheap and tears then you can always remove completely and mount it on EZ mount. I also remove the decal on the top and paste it on cd.
Now as to how I organized
I used transperencies to stick/cling the stamps on - one side to stick the stamps and the other side I stamped if there was no decal or image so that I know where the stamps go on.
Then I slipped the whole sheet into a sheet protector and placed/filed them into a ring binder. I used 3 " and 2 " binders
Now I can easily flip and get to my stamps easily.
And next week I am going to organize my cuttlebug embossing folders
I think I am getting some of these 5 x 7 protectors - for regular ring binder - http://www.amazon.com/gp/product/B000WA8S48 .
So how do you organise your stamps. Do share and post in the linky below
Top Menu
This blog is Moving
This blog has changed to domain Papillon Digital Design and the new domain is http://www.papillondigitaldesign.com/
Welcome
Welcome to PapillonDigitalDesign. Hope you get inspired by the projects, videos and files. Would love it if you could leave comments and become a follower. (Word verification is turned ON to avoid spam. Sorry for that inconvenience.) Would love it if you would also share your project here .
Due to the fact that the blog has moved there maybe some broken links. Please try deleting the s after designs from the broken link and try the link as the new link is http://www.papillondigitaldesign.com/
Thank you for visiting.
Sunday, October 30, 2011
Make the Cut works with Cameo
Yeah!
I just read Make the Cut works with Cameo!
For more details http://underacherrytree.blogspot.com/2011/10/silhouette-cameo-review-4-how-to-cut-to.html
I know the process is a bit more and tedious the first time. I prefer using silhouette designer studio as it is easy. But the more options the better. And easier to jump through many machines when you have a common software
And if you want to know more about cameo and silhouette do join the silhouette MB - http://s15.zetaboards.com/Silhouette_Plus/index/. It's such a great resource
Friday, October 28, 2011
Texturize & Embellish!
Hi
This is Pam from Papillon Digital Designs & The BugBytes. Thanks Allison and Caroline for having me on as a guest designer today at Paper Crafting Weekend Challenge.
Today's challenge is to use the things around you maybe the spider webs you got to decorate your home for Halloween (like I have done here) , spiders anything even ribbons or buttons to embellish your project and add texture.
Here is my card
I have used a plain black cardstock, silver wired ribbon (which I got from Costco - isn't it pretty?) , some buttons, a feather and the central image is from Dover publications - Greetingcards - which I printed out and cut out with some decorative scissors. I love Dover images.
Then I took a bit of cobwebs we get at store for decor and applied it to the cardstock. It looks better if you xyron or dilute tacky glue with water and apply with a foam brush allow to dry and then stretch out the spider web. Using ATG gun or tape leaves some marks which can be seen otherwise.
Here's a close up of the spiderweb
After applying the spiderweb I then added the ribbon (like a cross). Then I took some buttons and further embellished them with rhinestones and stickles and placed 2 buttons on the ribbon with glue dots. Then I took a feather and attached that and placed the center button. The rhinestones and stickles were added to bring some of the color from the image into the card else I felt it would stick out like a sore thumb.
I inked the image - matted it with black cardstock with corners rounded and then glued it with foam dots onto the card
As for the inside of the card I used the CTMH stamp on white cardstock. Again cut it out with decorative scissors and inked with red ink and added some stickles and then glued it on to the inside of the card with foam dots. I just placed a bit of silver ribbon to give pop
And that my friends is my simple Halloween card embellished with things to add a bit of texture. Now you can even give an illusion of texture for e.g I could have taken the spider web spread it around and then sprayed with paint (mist) or glimmer mist and the web would have acted as resist and could have got the texture of the web. So do play and add texture or give an illusion of texture and post your project for all of us to see. Thank you for having me as a guest designer once again Allison and Caroline. And readers thank you all for patiently reading this post. I look forward to see your project at http://papercraftweekendchallenge.blogspot.com/2011/10/texturize-embellish.html
Happy Halloween!
Pam
-
Wednesday, October 26, 2011
Happy Deepavali
WISH YOU ALL A VERY HAPPY DEEPAVALI
Today is our festival of lights called Deepavali - Deepa means lights.
To read why we celebrate you can find some info at http://en.wikipedia.org/wiki/Diwali though this does not cover everything as each community/region has their own version of the why's .
What it means to us is new dress, lots of sweets and savories, fire crackers and lights/lamps - lights for the season starting from today for a month till we reach another festival called karthikai.
WISH YOU ALL A VERY HAPPY DEEPAVALI once again
Saturday, October 22, 2011
The Silhouette Cameo - Opening the Box
Yeah! My cameo is here.
Love it.
Had to make a video of course!
Remember if you want new images if your studio is already installed you can go to file - preferences - advanced and then click on reinstate the initial 51 designs and you get cool additional images
I need to mention one great great resource other than the blog and yahoo group is the silhouette Message board formed by some members http://s15.zetaboards.com/Silhouette_Plus/index/
Do join in there.
Also there is a blog hop going on So do drop by http://www.thebugbytes.com/2011/10/fall-halloween-blog-hop.html and leave comments to enter giveaway. Do play and post your link to your project in the linky.
A sneak peak
Posted by
papillon digital design
at
9:03 AM
5
"kind encouraging and inspiring words"
Labels:
silhouette
,
video
Sunday, October 16, 2011
Frost Painting
Gasp! Gasp! Gasp!
I did a layout and that too by tearing out paper from a stack which I did not have any duplicate of and on the top of it I used my designer brads. What was I thinking. I wish I could have gone shopping before doing this (but nope no shopping for me for a while) as I wanted darker chocolate brown cardstock as that would have made the layout pop. But anyways!
I should thank Beatrice at Amazing Grace for helping me out as she asked me to get a birthday layout and told me to cut a cake die cut about 5 inches and start gathering the layout materials.
And another thanks to Allison and Caroline - my dear dear friends at Papercrafting weekend for making me use my stuff (even if I grumble and groan while doing so :) )
I have decided I am an organic scrapbooker. I don't follow sketches and just go with the flow. I know they don't turn out great but do I have fun :)! That's my story and I am sticking to it ;)
So here is my ( I think about my 10th or 11th layout). The photos are old ones taken way back. The camera used is an old point and shoot. This was actually during my 2nd son's 1st birthday about 8 years back but instead of the kids playing lol you see here my hubby and my sister in law playing with cake frost. So I decided to have sober background but fun colorful die cuts - maybe to portray adults having fun lol.
I have used cake doily. The pattern paper is from sweet stack DCWV and the background brown paper is Kraft paper from recollections. I wish I had a darker chocolate colored paper. Yeah! I have even used my sewing machine. The die cuts are cut from silhouette. The border - white is from pattern paper itself which I cut using scissors to be able to stagger and the rest 2 are using Martha Stewart punch. Other embellishments used are stickles, brad (sigh!), viva decor pen, pearls , some brown ink and some twine
Friday, October 14, 2011
Doily 1
I love doilies so I decided to make some. Simple ones to begin with and maybe I'll proceed to complex ones later.
I have loaded the svg files & silhouette file under the file tab.
Thursday, October 13, 2011
Altered Frame - 2 with Life is a beach
Hello
This is Pam
A while back I had made an Altered frame with liquitex gel beads, acrylic paint and some die cuts - http://www.thebugbytes.com/2011/05/altered-frame.html. Using the same method I made one more frame using this time die cuts from Life is a Beach cartridge. I usually cut images in sand colored cardstock and color it in if they are tiny. I have used same materials as last time ie
wooden frame - dollar frames at micheals
Here are a few pictures of the frame
This is Pam
A while back I had made an Altered frame with liquitex gel beads, acrylic paint and some die cuts - http://www.thebugbytes.com/2011/05/altered-frame.html. Using the same method I made one more frame using this time die cuts from Life is a Beach cartridge. I usually cut images in sand colored cardstock and color it in if they are tiny. I have used same materials as last time ie
wooden frame - dollar frames at micheals
Gesso
Acrylic tube paint as
heavy body is good while mixing rather than liquid ones
Liquitex Gel Glass
Bead
Martha Stewart Glass
beads
Sponge brush to apply
Gesso
Plastic palette knife
to apply the glass bead mixture
Plastic or disposable
plate for mixing
Cardstock - I just
cut all of mine on beige and colored with markers but you can use appropriate
colors
Die cutting machine -
Here I have used cricut expression and Life is a Beach cartridge. But you can use any die cutting
machine
Glossy accents or
diamond glaze
Water in a disposable
container or a plastic container
And for the clouds I just tore up some tissue and applied it when paint is yet wet.
You can of course seal it all in the end using gel medium or a suitable sealant
Wednesday, October 12, 2011
Suddenly from 2 weeks back I had the problem of PS CS5 64 bit not opening while the other one 32 bit worked.. So did a chat with adobe but after asking all the details and making sure to get my serial number lol that technician said call CS the next day and he couldn't help. Lol. He knew the problem and asked that and so why should he ask for rest of details? Gad knows.
But then i decided to work on it on my own and look at the problem logically. Only thing I had changed was reinstall wacom intuos5 medium. I already had it there and I think reisntalled it over. So I went and uninstalled wacom and wow problem fixed CS5 working. Then I reinstalled wacom and now both work. Saves me having to call.
Silhouette studio update v 2.2
Hope you all have updated your silhouette studio - it is now version 2.2. And atleast it has fixed the moving files in the library. User files weren't moving after that 1.9 update and now yeah it does. They sure listen and work on it and fix it. I am so glad as it is good news for my cameo!
And check it out now we can see the ratchet blade under cut settings and it is default. So if you are using old sd model you have to change it to caps before cutting.
To know more about update releases and what each do check out this link
http://www.silhouetteamerica.com/faq.aspx?solutionid=629
And check it out now we can see the ratchet blade under cut settings and it is default. So if you are using old sd model you have to change it to caps before cutting.
To know more about update releases and what each do check out this link
http://www.silhouetteamerica.com/faq.aspx?solutionid=629
Tuesday, October 11, 2011
Zing or cameo?
That's such a tough tough choice to make. I would say go for both! Thankfully I do not have to make such a decision as I already have the knk which sadly I have not yet played with as yet but the power of that machine - wow! Zing is a baby sister to my knk maxx (actually my eagle lol) compared in power zone but still to see the settings on the control panel gives me a rush and I'm sure the zing will have almost the same effect. But when it comes to print and cut silhouette with it's optical head is unbeatable king! While optical head has problem reading on dark paper or some say vellum I say why would a person print on dark paper for printing and cutting? Very rare! The machine tracking it for you is great!
So the ultimate choice comes down to what to do you do most ? cut many types of materials or print and cut? Then you gotta choose Zing for the power to cut many materials or silhouette cameo for print and cut. And frankly some say MTC then zing but I do not hold water to that as silhouette studio is very powerful especially the designer version and you can always take that extra step and go between many software - svg files are so compatible between software.
Isn't that a tough decision? :) I would say just buy one for yourself and ask or hint strongly the other to your loved one as gift lol and that way you have got yourself covered ;).
Friday, October 7, 2011
Skeleton in your Closet? No? Just a skeleton in your card
It's going to be Halloween soon and my son wanted a card with skeleton! So here is a card I made with a skeleton image. Hello This is Pam from The Bugbytes - your sassylady designer today.Now this card is a bit interactive. The skeleton head wobbles! My son loves interactive card so I had to add that part in. And so grossly amusing for him was that bit of spider dangling from the mouth! Boys! well guess I should say girls too as I found it grossly amusing too.
The image itself is from Dover publications. I love these books and have tons of these books. Now this I think was a free sample image and of course I had to use my favorite toy to make this card - silhouette studio.
Since I have designer studio in silhouette - so so worth that extra money to me as possibilities become endless - I added the image as pattern
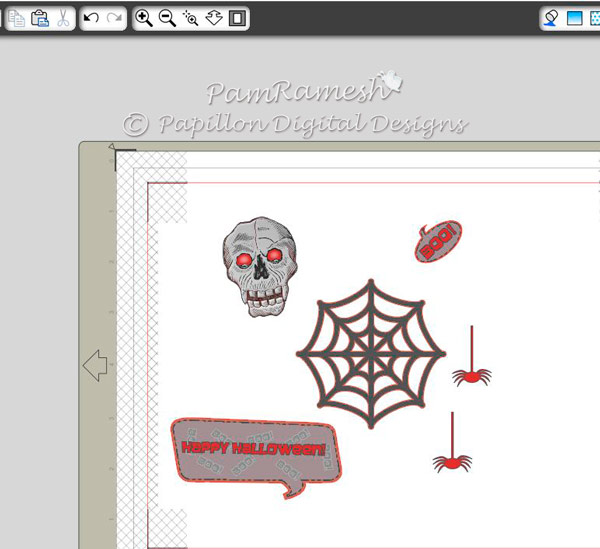
So my card in silhouette window looks like this,.This one I just printed and cut with Fiskar cutter
And I added some extra bits and used registration mark and then print and cut the following in silhouette
Now the skeleton head I did not use the trace feature but instead just free hand added nodes and then manipulated the nodes and once I was happy used the crop feature and cropped the shape drawn with the image to give me that skeleton face. Then I just added a speech bubble filled it with grey using dropper to pick colors from the card image. I typed in Boo in grey blue and copy pasted it multiple times to form a pattern and then typed Happy Halloween. Similarly I did the Boo oval bubble too.
After cutting I took a small piece of jewellery wire wrapped it 4 rounds around a sharpie pen and cut it and attached the spring like wire to card(on top of the image where skeleton face is) using tacky over glue and then attached the skeleton head on the other end of wire. This is such an economical and a quick way to make your own wobbles.
I then added red rhinestone to the eyes and some stickles to the teeth and spider and the word boo. I also used white stickles to free hand some web shapes all over the front of the card just to add texture. I stuck the spider dangling from the teeth and used foam dots to attach the Boo shape.
So that's my simple Halloween card for my son. Thanks Sheila for having me as your designer. Wish you all a Happy Halloween in advance!
Subscribe to:
Posts
(
Atom
)