This blog is Moving

This blog has changed to domain Papillon Digital Design and the new domain is http://www.papillondigitaldesign.com/

Welcome

Welcome to PapillonDigitalDesign. Hope you get inspired by the projects, videos and files. Would love it if you could leave comments and become a follower. (Word verification is turned ON to avoid spam. Sorry for that inconvenience.) Would love it if you would also share your project here . Due to the fact that the blog has moved there maybe some broken links. Please try deleting the s after designs from the broken link and try the link as the new link is http://www.papillondigitaldesign.com/ Thank you for visiting.

Sunday, January 19, 2014

Marianne Creatables - Anja Vintage - LR0269 - LR0273

Hi
This is my 3rd release at Dutchpapercrafts. Do check out the video at Darlene's if you came here directly.
This is a beautiful set of dies. Lol - To  me all dies are beautiful. I just love dies. Hope after seeing these creations it inspires you to buy the dies too at Dutchpapercrafts


Here are the projects -

Most of the dies used are the above dies. In case I used any extra die, embossing folder or stamp I will try to list it in the project

1) Carousel Circle exploding mini album

You can see youtube for links on how to make the mini album.
Here are a couple of links
http://m.youtube.com/watch?feature=fvwrel&v=k9PNYrknPbM

http://m.youtube.com/watch?v=k9PNYrknPbM&feature=fvwrel

Now the only thing I did was calculate the circle size I needed as the width of LR0269 is 5" so with a bit of Pythagoras theorem (ha ha nice talking maths lol) the approx size of circle is around 7.2" so you can make a circle diameter as 7.25" . If you have grand calibur and grand circle die (not the small ones but the huge ones) then use the outermost circle. Well if you can cut svg then I do have a file for you. You can download under the svg tab in this blog. I will also make a svg for the petal card and the 4 drawer card .
Here is just the image only


Ok so here are the pictures of my mini album.
Before layering I added ribbon and then layered the quarter circles. This ribbon keeps both the mini album closed and when in carousel open mode (lol) you tie it up to keep it open too.


The large flower was a wooden die cut from micheals. The smaller rose was handmade bu just cutting a spiral free hand (wonkier the better lol ) and rolling it.

Now the anja die LR0269 and right hand doe of lr270 are edger dies. To get this shape I just cut out straight edge using cutter.
More images


I also cut out tags . I used LR0270 (left die from top picture) and stuck only half to paper to insert the tag as you can see below.


2) Box Card

This is my 2nd box card (for the 1st see linnk - http://www.thebugbytes.com/2012/12/box-card.html )

This card can easily be made without the svg file too. To see how the card is made you can search for videos on youtube.
Here is just an image on the box card file for those who don't have a machine that cuts svg's.
Use a full 8.5 x 11 (ie letter size) paper
score 2.5" from one end (long end) and then 1.5". Repeat on the other side of the long side), Then turn over to short end (8.5) Score 1.5" from both ends. Then you can fold and then cut away (cuts where 4" ie 2.5 +1.5" meets with the perpendicular 1.5")


The stamp is Anna Griffin sentiments


I made pins by embossing with UTEE. (I did not dip in melting pot as I did not want to cover up the holes but I used versamark and embossed with UTEE instead of plain powder)

3) Petal Card

I have an svg file for this as well .


The inside


The small flower is from Anna Griffin dies (I just cut off a small portion of that huge die cut). The stems annd swirls are from this release. Stamp is also Anna Griffin. 


If you don't have an svg then just draw a square of 5x5 and then a semicircle of radius 2.5" from center of each side


4) Purse card

I saw this video and adapted the purse. 
The measurement to get the 5" width we need is 10"x 12" instead of 81/2 x 11
And I do have an svg file.

Here is my purse. I used velcro to close with one of the dies from  lr0273 as clasp. I added some bead chain for handle


Some tags to go inside the purse ( I think the stamps are from studio G not sure as one of my friends Dawn gave these to me.)


5) 4 drawer easel card (6"x6")

The easel is made from 6 x 12 card and for the top of the easel and the bottom base of the drawer 2 - 6x 6 sheets. I have a svg file just for the drawers and shelf and not for the rest.
Here is a look at how the drawers go in the box. All drawers are same size (2.5"x3.5" when assembled. Used different colors to distinguish)
I have the svg file and you can also search for videos on youtube.


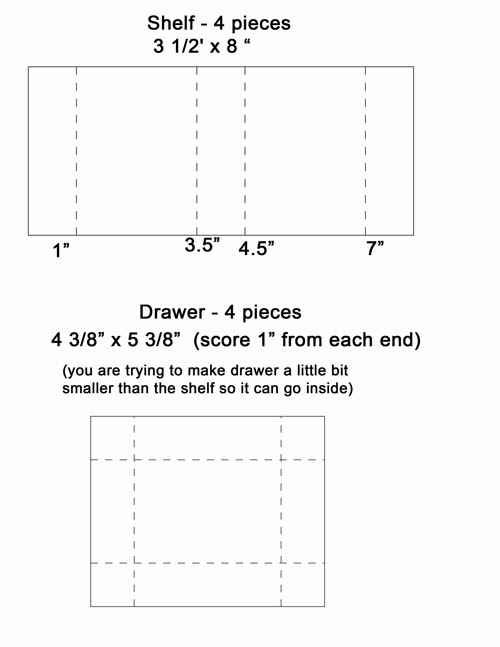
In case you dont have a machine here is a jpg which explains the dimension


You just have to add a 6x 6 for base where you stick the drawers
and for the easel top top-   a 12 x6 (scored at 3 and 6 for easel part)  and another 6 x 6 which attaches  on one half of the easel)

So basically you need
4 pieces of 3 -1/2" x 8"  (shelf
4 pieces of 4 - 3/8" x 5 - 3/8" (drawers)
2 pieces of 6" x 6"
1 piece 12" x 6"

The card box


Top stamp and Die - Heartfelt creations -Tattered Blossoms
(Die - HCD 722 & stamps - HCPC 3468, HCPC 3469)
The tattered blossom dies and stamps are available at Dutchpapercrafts
Sentiments and inside butterfly & flourish - Florishes Stamps -Butterflies and Blossoms Set- SS138
Paper Clip - just a clip with the diecut (Glittered and added glossy accents)

Side view


A close up of the paper clip using the die


Hope these projects inspired you. Aren't the dies so intricate and beautiful?
Do share the projects you made .
Thanks for Reading.


P.S - Edited to add images for those who cannot use the svg files


siggy photo 96c7330f_zps4cf3aab8.jpg

Saturday, January 18, 2014

Some Bunny Loves You

This Sunday Release at DS4J Shop has some cute images and one of these is Bunny Egg
Here is a card I made using this lovely image


I colored the image using colorbox chalk ink with Fantastix Brush Tip.
The dies are spellbinder bluebell d'lites
Memory box - wild Flower Field.  It cuts the small flowers each individually. I stuck it behind the grass border which is a die from die versions - my favorite things.
The embossing folder is also from spellbinders.

Some challenges I am entering this card into


  1. http://qkrstampede.blogspot.co.uk/2014/01/qkr-stampede-weekly-challenge-71-white.html
  2. http://graphitmarkers.blogspot.co.uk/2014/01/wk-3-graphit-challengeanything.html
  3. http://savvyhandmadecards.blogspot.ca/2014/01/furry-friends-challenge.html
  4. http://wagsnwhiskersrubberstamps.blogspot.com/2014/01/challenge-120-anything-goes.html
  5. http://acreativeromance.blogspot.co.uk/2014/01/beckys-sketch.html
  6. http://beinspiredchallenge.blogspot.ca/2014/01/be-inspired-challenge-46.html


siggy photo 96c7330f_zps4cf3aab8.jpg

Hello Dear - Sunday Release

This Sunday has some fun release at DS4J Shop.
This funny image is perfect for valentine  called "Hello Dear"


The pattern paper is from American Crafts. I printed the image on a heart (using photoshop). I added a doily and some buttons and a metal heart embellishment and tied a length of raffia into bow.
 I want to enter the card in some challenges


  1. http://jellyparkchallenges.blogspot.com/2014/01/jellypark-friends-new-challenge-buttons.html
  2. http://jwscrapshack.blogspot.ca/2014/01/ffc-33-its-love-thing.html
  3. http://brownsugarchallenge.blogspot.com/2014/01/challenge-77-anything-goes.html
  4. http://www.frosteddesigns.blogspot.ca/2014/01/friday-challenge-polka-dots.html
  5. http://simplycreatetoo.blogspot.com/2014/01/challenge-53-valentines-day-or-use.html
  6. http://wagsnwhiskersrubberstamps.blogspot.com/2014/01/challenge-120-anything-goes.html
  7. http://digitallysweetchallenges.blogspot.ca/2014/01/dsc-71-anything-goes-with-lacy-sunshine.html
  8. http://creativefingerschallengeblog.blogspot.co.uk/2014/01/20-anything-goes-with-scrappers-delights.html


siggy photo 96c7330f_zps4cf3aab8.jpg

Tuesday, January 14, 2014

SSD Challenge #8 - Show your folds

This month the challenge at Sassy studios (moved to facebook Sassy Studios group) is Show your folds. The fold can be in card or image. The image we had to play with is  Katniss Girl of Fire Sassy. I made a interlocking fold card using spellbinder grand ovals.


I have also used anna griffin embossing folder and snips of anna griffin floral die to decorate, Very quick and simple card.


siggy photo 96c7330f_zps4cf3aab8.jpg


Saturday, January 11, 2014

DS4J Sunday release - "Parisienne bistro

We have some awesome new releases this week. Check them out at Digistamps4joy shop.
One of the new images is "Parisienne bistro". I have combined it with Martini Supermodel in the card below.


Don't you love the die? It is from tattered lace. Using this for the first time and I am so in love with it's intricate cutting. Unfortunately not so readily available here in U.S. Only scrapyland and franticstampers carry it now and not all of them :(. Cardstock is old stash - DCWV La Creme

Here are some challenges I want to enter this card into
  1. http://acreativeromance.blogspot.co.uk/2014/01/something-new.html
  2. http://sisteractcardchallenge.blogspot.com/2014/01/challenge-39.html
  3. http://simplycreatetoo.blogspot.com/2014/01/happy-2nd-birthday-to-us-challenge-52.html
  4. http://stampingwithdragon.blogspot.com/2014/01/stamping-dragon-challenge-anything-goes.html
  5. http://leftofcenterchallenges.blogspot.ca/2014/01/challenge-22-new-beginnings-with.html
  6. http://jwscrapshack.blogspot.ca/2014/01/ffc-32-anything-goes.html
  7. http://cardmakinmamas.blogspot.com/2014/01/cmm78-anything-goes-sponsored-by-art-by.html

Note: This card won in http://leftofcenterchallenges.blogspot.co.uk/2014/01/challenge-22-winners-and-midway.html


siggy photo 96c7330f_zps4cf3aab8.jpg

Tuesday, January 7, 2014

DS4J CHALLENGE # 83 - 'Glitter 'n Sparkle"

Happy New Year to all of you.
The challenge this fortnight at DS4J Challenge Blog is 'Glitter 'n Sparkle" . An apt theme to celebrate New Year isn't it?
I have used an image called Joy


For the background paper I passed the cardstock through xyron machine to apply glue all over. Then placed a lace on it and added blue glitter. Then removed the lace and added green glitter. That's how you get the pattern on the glitter. I then sealed it with sealant. The image is colored with copics and then I added spica and stickles to it. Punched the edge of the cardstock and added ribbon and some flowers and cut some swirls (I think it was marianne die). Some rhinestones colored blue with copics for bling.
Please do join as at DS4J Challenge Blog and post your project fitting the theme in the linky found there.

I want to enter this in some challenges
  1. http://fattastictuesday.blogspot.com/2014/01/fan-tastic-tuesday-challenge-17.html
  2. http://justinspirationalchallenges.blogspot.co.uk/2014/01/team-b-with-aurora-wings-girly.html
  3. http://lejdesignschallengeblog.blogspot.co.uk/2014/01/lej-designs-challenge-no-85-anything.html
  4. http://papertakeweekly.blogspot.com/2014/01/anything-goes.html
  5. http://www.ttcrd.blogspot.com/2014/01/ttcrd-challenge-january-7th-to-january.html
  6. http://cardsundmore-challengeblog.blogspot.com/2014/01/challenge-97-anything-goes.html
  7. http://creativecraftchallenges2.blogspot.com/2013/12/challenge-26-anything-goes.html


siggy photo 96c7330f_zps4cf3aab8.jpg