This blog is Moving

This blog has changed to domain Papillon Digital Design and the new domain is http://www.papillondigitaldesign.com/

Welcome

Welcome to PapillonDigitalDesign. Hope you get inspired by the projects, videos and files. Would love it if you could leave comments and become a follower. (Word verification is turned ON to avoid spam. Sorry for that inconvenience.) Would love it if you would also share your project here . Due to the fact that the blog has moved there maybe some broken links. Please try deleting the s after designs from the broken link and try the link as the new link is http://www.papillondigitaldesign.com/ Thank you for visiting.

Thursday, November 22, 2012

Happy Thanksgiving

Happy Thanksgiving

Had to make some cards. The images are from Sassy Cheryl. Love these 2 cute images. My son wanted a boy card but couldn't resist the other cute girl image.
The pattern papers are all digi papers from cosmo cricket - from jessica sprague which I got way back. I think they are from circa pack and everlasting pack.

1st card


2nd Card


post signature

Monday, November 19, 2012

Christmas tag swap

Sheila from http://shesasassylady.blogspot.com/ and myself ie from http://www.thebugbytes.com/ decided to hold a tag swap for Christmas for both our designers ( in US only this time). 15 took part including Sheila and myself.
The requirement of the tag was that it had to be approx -  6 1/4"x 3 1/8 and not too bulky while layering so that 15 of them should fit inside a small usps flat rate box. Theme was Holidays

Here is a list of all the lovely designers who took part in this awesome tag swap

1) Sheila - http://shesasassylady.blogspot.com/
4) Elizabeth –   http://217creations.blogspot.com/
6)   Michelle -  http://ladyofleisureink.blogspot.com/      
7)   Jeannie - http://nonnasscraps.blogspot.com/      
8)   Beth -  http://thunderbirdlindybydesign.blogspot.com/
9)   Lisa -  http://momtooneson.blogspot.com/
10)  Denine - http://www.pumpkinspiceblog.blogspot.com/    
11)  Carolyn - http://cccscraproom.blogspot.com/      
12)  Charlotte - http://alittlebitofdetail.blogspot.com/      
13) Jennie - http://javajencreations.blogspot.com/      
14)  Cheryl - www.cherylswindow.com
15) Pam - http://www.thebugbytes.com & http://papillondigitaldesigns.com/


Now to the eye candy part - Here are the tags which came to me. Since Sheila has been a little busy she did the communicating role and I did the shipping part of it. So I should say I saw all the tags first :) :). Yeah! You should have seen me shouting with joy as each box came home. Yep I did dance a jig when each one came. Couldn't wait for the last ones to come home to mama. I did not send emails back to the last few I got as I sneaked to post office posted them and dint mention I did so as to surprise them all ooh was it worth it! when I got the first excited email!!! What fun!! 
Ok enough of me blabbering! Here we go in the blog listed order

1) Sheila did this wonderful tag. The penguin wobbles as you can see from the blurring action. She also sent a tiny circle tag. That girl always goes the xtra mile doesn't she? Once again her blog - http://shesasassylady.blogspot.com/


2) Lori sent this cutie. Love the rich colors. Love that pretty blinged newsprint star  and how she cut the 25. Her blog - http://scrappinmystressaway.blogspot.com/ . Do read her blog post about the tags to see the details in the making of this tag - http://scrappinmystressaway.blogspot.com/2012/11/tag-swap-beauties.html


3) Cricut couple sent this wonderful tag. Love the colors chosen. That pink snowflaked paper is so so pretty. Their blog -  http://cricutcouple.blogspot.com/


4) Elizabeth aka makeupgirl217 from http://217creations.blogspot.com/ sent this tim holtzy tag. The background is canvas. Love the texture on this one and the way she weaved the wreath/garland around the reindeer's neck. And the jingle bell. Love it!


5) Melissa from http://melissamade2.blogspot.com/ sent this lovely colored tag. It is a flapped tag so that we can add a message inside. Love that reindeer with that big nose. Cute!. I also got a cute colored card in the box she sent me. How sweet! 


6) Michelle http://ladyofleisureink.blogspot.com/ sent this wonderful tag. Love that blue colors and the candy dots on the tree as ornaments and the snow texture. Awesome. She also sent me a very pretty card. I will share the card on another post along with Melissa's lovely card. I tell you I have seen our designer's work on the blog but they do not come close to seeing, holding and touching their wonderful creations in person!!
Michelle's tag came in the lovely sealable plastic cover with her blog and detail on the label used as closure. Isn't that a wonderful idea. I so loved it that I copied the idea . I ordered some bags for my tags too and printed on a avery label. So easy to design on their software and then print it out! And she has a blog post about all the lovely tags - http://ladyofleisureink.blogspot.com/2012/11/tags-galore-part-1.html


7) Here is Jeannie 's - http://nonnasscraps.blogspot.com/  Beautiful tag. Love the shape of the tag. Her layering style is awesome.I still enjoy looking at the card she once sent me. The layering in that was beautiful too. She is such a sweetie.


8) Beth aka thunderbirdlindy from  http://thunderbirdlindybydesign.blogspot.com/ sent this gorgeous tag. Love the blue color and the way she has attached the fence. That faux rosette is so cute (which I think is from the close to my heart artiste collection if I am not wrong) Awesome!


9) Love this action tag - another wobbler tag - this one an adorable elf from Lisa - http://momtooneson.blogspot.com/ .I love the texture she added o the string the elf holds. Awesome job Lisa


10)  Denine - http://www.pumpkinspiceblog.blogspot.com/ sent this little beauty. Don't  you love tree with those different pattern papers . I Love how she has used so many pattern paper but still they look unified!


11) Carolyn from http://cccscraproom.blogspot.com/  sent this lovely tags. So richly embellisshed. Head on to her blog to read her blog post about the tags if you want to see the items she used to make this awesome tag. So many stamps and dies for both the front and the back. Love it. http://cccscraproom.blogspot.com/2012/11/2012-christmas-tag-swap.html


12) Charlotte from http://alittlebitofdetail.blogspot.com/ sent this cute vintage tag. Love the colors. That blue is awesome against the beige/sand color and the reindeer die cut on that cute label with the bling is so perfect! 


13) And this gorgeous purple colored tag is from Jennie aka Javajen - http://javajencreations.blogspot.com/. Love that shade of violet/purple. The ribbon she has used is so cute!


14)  Cheryl from www.cherylswindow.com sent this gorgeous card. Ooh the texture on this one!. She is so good with multimedia ! This one is so rich in texture like Elizabeth's tag. Cheryl also has a lovely blog post up - http://cherylswindow.com/christmas-tag-swap-using-sizzix-eclips-and-stamp2cut/


And lastly my tag


The base is kraft recollection paper. The red pattern paper is a digi paper .  The bow and holly and the tag are all cut with silhouette.

Here are the elements in a composite file. While cutting I used different files for economically using the paper/cardstock


The image is from dover's. I stickled the snowy regions and the ornaments 

The ribbon (bordering the tags) is from an Indian roll I had. We generally sew this on to our dress - churidhar or saree blouses. The corner die cut is from spellbinder parisan accents. I added the tag and a jingle charm to the white ribbon which is actually eggshell seam binding. I used some pearl spray behind the bow for added embellishment. On the back of the tag I stamped a swirl, some lines from a tag stamp and a bit of sentiment - as a note area. All these were stamped using the tim holtz markers. I went over the edges and also some areas inside the stamped area with memento dew drop - platinum.

Well that took care of the tags. I also made a card to send along inside 


I cut the red paper using the zutter . When cutting bulk this comes in so handy. Then using my big shot pro and sizzix texturz plate from kit 13 - http://www.amazon.com/gp/product/B001GP34SS/ref=ox_ya_os_product I embossed the red cardstock. The snowflake border - isn't that so cute? I love it is from memorybox dies which I got from dutchpapercrafts. ooh the pretty tree is also from dutchpapercrafts and is a cheerylynn doily tree die  I think. Inside of the card I just punched 2 circles with a circle punch and used paper trey ink ticket collection stamp (with the coordinated die) . The Happy holiday part was from another stamp set also from paper trey ink I think. I punched a small heart in green CS using a heart punch and used the left over snowflakes from the border (sift through the die cut confetti before throwing them out lol). Most of the pearls on the tree and flakes were added using the viva decor  liquid pearl.

Now these tags deserved to be wrapped up with due respect before sending them off to their wonderful homes didn't they? So I used these lovely muslin bags from http://statelinebag.com/muslin-bags/premium/  . I stamped using versacraft black ink which can be used on fabric and wood - They are ssortment of stamps mostly  from paper trey ink and a few from CTMH I think. http://www.amazon.com/gp/product/B00161Q1MI/ref=wms_ohs_product
Then I colored using copic markers and added some diamond stickles.

After dividing all the tags and I should say a special thank you for each designer as they thoughtfully sent me 15 sets Instead of just sending me 14 ie keeping their tag for themselves . This made the dividing and sorting so so easier!. Well to continue I put the tags in the bag and the bag inside another ziplock bag so that all the precious tags don't get waterlogged in case of inclement weather and put them in priority box and off they were sent to their loving homes. And here I sit atleast looking at all of them once a day and enjoying them :)

post signature

Tuesday, November 13, 2012

Happy Deepavalli

Wish you all a very Happy Deepavali Today is the festival of lights. "Deepa" means light and "Bali" means an array or row . It signifies the good conquering evil! People wake up early have an oil head bath and wear new clothes and take the blessings of elders and gods. Lots of savories - both salty and sweet. And of course firecrackers! ! What fun! Then we go out and exchange sweets with relatives and of course show off our pretty new dresses! In the evening rows of mud lamps - deepas are lit.A beautiful sight to behold. WISHING YOU ALL AVERY HAPPY DEEPAVALI ONCE MORE
post signature

Tuesday, November 6, 2012

Yeah! what a great weekend!

Had a wonderful weekend at the  Copic certification class. Our instructor was Colleen Schaan.  What a sweet sweet person. Loved her instructions. Her joy in the art came through. And got her autograph on my copy of her books :)
What a great and interesting bunch of colleagues ! We had a fun time! Hopefully a lot of us will keep in touch.


post signature

Happy Birthday Pam


Happy Birthday to a Sweet - Sweet Lady!

Friday, November 2, 2012

Treats ! There is always an occasion!

Hello
 This is Pam from The Bugbytes  & Papillon Digital Designs your designer today  on She's a Sassylady.
And wonder of wonders no copic colored project today for you. Gasp!!!
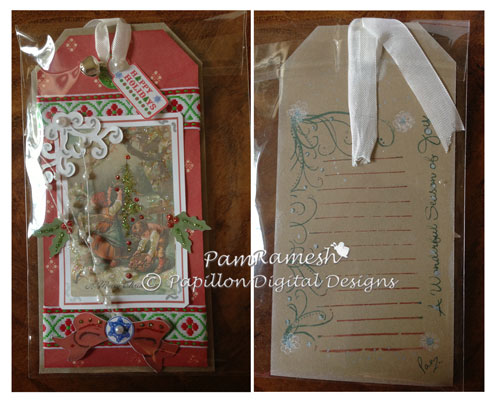
I thought I would share with your a simple project I made. This treat bag and card can be used for all occasions. You can just change the pattern paper to suit the occasion.


The treat bag is a pencil pouch from silhouette store.  I resized it to fit a 8 1/2 by 11 paper. When I resized I made sure to ungroup the circles (for the tie/bind) and then regrouped them so that the size of circles does not change as I did not want the punched holes too big or too small.
I used twine to close after adding the candies of course. I decided to bring in a little blue by adding it in the flower and also the small punched flower (ek success). The design is also from silhouette store.


For the card I decided to add some twine too like a border and punched some flowers (ek success) to go between the 2 rows of twine. Too make the Twine border I just ran my ATG scotch tape and cut 3 strips of twine and glued it on. 3 layers of twine fills in the tape beautifully. A center flower finishes the card


For inside of the card more twine and punches and a label cut in silhouette sd


So that's my project for today.
Hope you all enjoyed it. Thanks Sheila for letting us  post in your lovely blog.
Happy Crafting!

post signature